
By Brian Shenstone, Multi-time National Champion
Most of us in the midwest have our boats out of the water and buttoned up for the winter. Other than working on the rudder or other miscellaneous parts that we are able to bring home, we are not left with much else to do but plan our activities for when the snow melts in the spring. Along those lines, I’d like to make a suggestion.
These boats are now 35+ years old or more and although the standing rigging and spars are of a fairly robust design, there is always the risk of loosing a mast as a result of failure of one component or another. Since the original equipment mast sections are no longer in production, replacing a mast becomes an expensive proposition. The cost of the new mast may, in the insurance company’s eyes, approach or exceed the valve of the boat leaving the owner in the position of having to “total” a perfectly good boat. Also, a dismasting poses the risk of seriously injuring a crew member. I’d suggest that it makes good sense to thoroughly inspect and maintain your chain plates, standing rigging and spars
Here’s What To Do
First, before you step the mast, inspect the deck chain plates, headstay chainplate and bridle chainplates. Let’s start at the bow and work aft. Make sure that all of the fasteners that hold the headstay chainplate are tight and that this component is sealed to the deck. The bolts that hold the strap the runs over and down the bow of the boat are probably the most important. There is plywood backing behind the four bolts on the top that will soak up water and become weak if the chainplate is not properly sealed.
Next, check the upper and lower shroud chainplates by insuring that all of the bolts below deck are tight and that water is not leaking in from the top, which is a common problem on Cal 25’s
Now for the hard part. Check the tangs for the backstay bridle on the transom for tightness. We don’t pay a lot of attention to these components as there is some redundancy in having two of them but they are very important, especially with the level of back stay tension that some of us like to carry. Check the bolts for tightness and insure that the tangs are properly bedded. There is no wood behind these parts but there are nuts on the inside of the boat and getting to them is a tuff job. You may also find that the top screw never had a nut on it since it comes through the hull in a place that is very hard to get to. Tighten everything down, use lock washers, nyloc nuts or apply Locktight as you will not likely climb back in the stern of the boat to check these fasteners too often. Once you have been through these components you are ready to check the standing rigging.
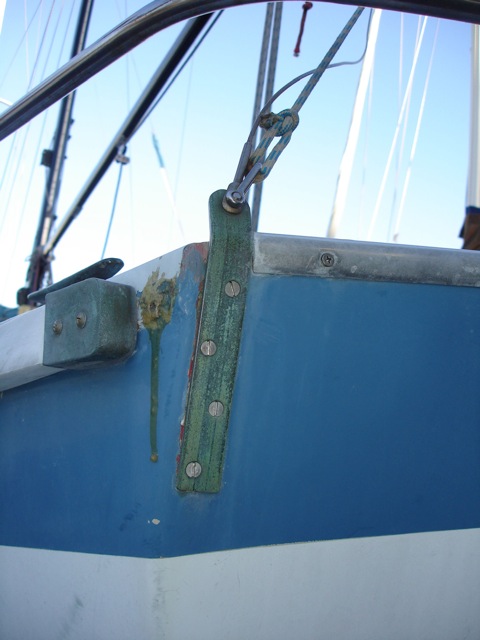
- Check Transom Tangs
First check all of your shrouds to be sure that the swage fittings are in good shape. The most likely failure point is the deck end of the shrouds as these joints hold water and therefore corrode from the inside. The first indication of a potential problem is usually that one of the outer strands of the cable begins to unwind. This may be an indicator that that particular strand is broken inside the swage. It is likely time to replace the shroud if you see this type of symptom.

- Check Turnbuckles
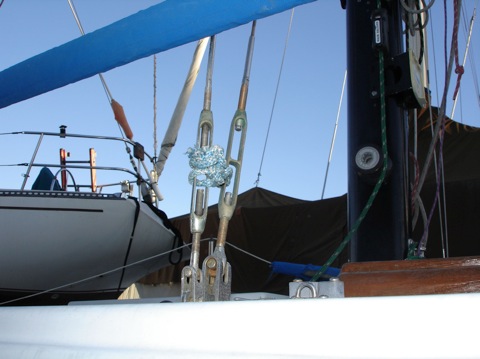
Next check all of your turnbuckles to be sure that none of them are frozen. Frozen turnbuckles are either corroded or bent, neither of which should be trusted to hold up your spar.
Then check your headstay. If you have the original equipment style turnbuckle with the forged forks you need to make sure that you don’t attach a forged fork on the lower end of the headstay turnbuckle to the chainplate. The headstay must be able to pivot both fore/aft and right/left. If you have a toggle in the headstay or have the type of turnbuckle that has a strap over “T” pin your OK.
- Check Spreader Bases
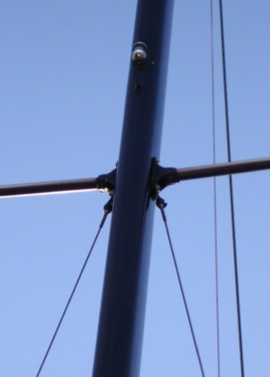
The original equipment parts are made from cast aluminum and are brittle and regularly fail. Look for any signs of cracking or better yet replace them with stainless steel bases. The difference here is that with the cast aluminum part, if the upper shroud takes a hit of any kind you will have a catastrophic failure where a stainless part will likely bend but may continue to hold the spreader in place and the mast up. Seals Spars, San Francisco has replacement bases with a better design than the three point potato chip original style or I have a source in the Detroit area that builds custom Stainless bases that fit the original holes for $28 each.
The spreader bases should be attached as they were by the manufacturer. The lower attaching bolt runs from through one spreader base, through the mast and then through the spreader base on the other side of the mast. An aluminum tube (called a compression tube) on the bolt acts as a spacer between the two bases and the hole in the mast is a clearance hole for the tube. This means that as you tighten the bolt, it clamps one base to the other but no force is applied that might compress the mast section. Once everything is in place, the nut is struck in several places with a punch so that it can not back off. The upper two attaching locations on each base utilize sheet metal screws or bolts and if you find that they become stripped out, it is possible to add nuts on the inside by working through the steaming light hole. Whatever you do, don’t through bolt the top holes on the bases from one side to the other because you will compress the mast section before you develop enough clamping force to secure the bases.
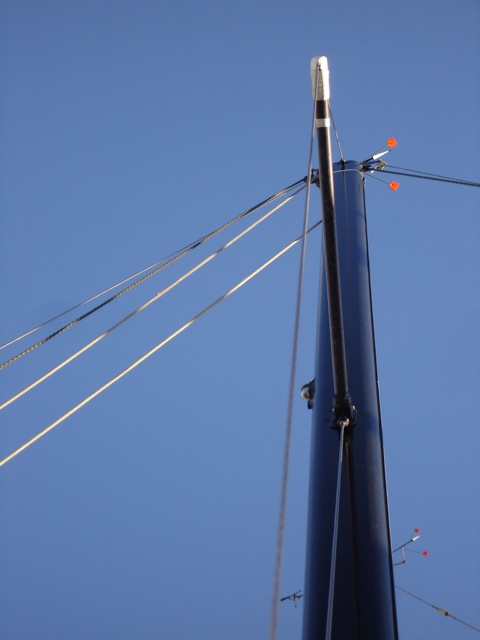
Now go through the entire mast and make sure that all screws in the mainsail track and the spinnaker pole track are tight. Also insure that whatever you have for a gooseneck fitting is tight. Most of us with hard vangs find that this is an ongoing problem since the gooseneck fitting sees extra loads. Next check all of the cotter pins and bolts at the mast head to insure that everything looks secure. This is probably not a good place to use ring dings. Also check the bolt that secures the tangs for the upper shrouds.
Next, install your shrouds.
- Install & Check shrouds
I use cotter pins everywhere except at the deck where I use ring dings but I am careful to completely cover the rings with tape so that sheets don’t hook on them and tear them out. Self amalgamating tape seems to stay in place longest although I did learn a trick for using the 3M vinyl tape and that is if you cut the tape with scissors instead of stretching it until it breaks it will stay in place much longer. Make sure that you bolt or pin the spreaders to their bases and an area that you should pay close attention to is attaching the upper shrouds to the spreader ends. If the upper shroud pops out of its grove on the spreader end cap on the loaded side (windward) the mast will likely come down. Also remember that when you are on the wind, the only thing holding the shroud in place on the leeward side is whatever means you use to attach it. My preference is heavy gage copper wire and what I do is strip a piece of 12 or 14 gage Romex that you would use to wire a house. I run the wire through the end cap and spreader and then wrap it tightly around the shroud 5 or 6 times both above and below the spreader. I then wrap it with tape and install a plastic spreader cap. I also like to cover the cap with sail maker’s number cloth which allows the sail to slide over the spreader cap easily.
If you check these things in the spring, you should feel confidence that your rig will remain sound throughout the sailing season.
If you have any questions or need additional information, just send me an EMAIL.
Thanks,
Brian Shenstone
Draco #1633
Preventative Maintenance for your Cal 25 Mast & Rigging
No comments yet.